ExpandableButtonMenu
项目描述
项目里有时会遇到这样一种设计的菜单样式,当点击一个按钮时,把菜单选项展开,其中根据需要在加上相应的动画。 Github 也有很多的开源动画,本次为了完成项目需求,学习了两个开源动画库:
两个都是自定义 View ,相对来说第一个更加简单点,难度在于怎么利用贝塞尔曲线实现主 button 的动画,最大的缺点估计就是 GooeyMenu 的大小是包括了展开后的布局,这就限制了它的适用性,而该库的主要目的也是为了实现主按钮的吸附动画。第二个库相对复杂一些,这个库 View 的大小就是主 button 的大小,展开的菜单绘制在原本 View 的上层,并添加了背景的模糊效果,也通过代码添加了 button 的状态变化和点击时的涟漪效果。
GooeyMenu
这里包含了展开/收起 、主按钮旋转、主按钮大小变化(贝塞尔动画)几个动画组成,利用属性动画不断改变对应的值,重新绘制界面来形成整个界面的动画效果,通过 CirclePoint 类封装每个菜单子项的角度,位置,半径属性,在 onTouchEvent() 判断点击区域以及展开收起状态等做相应的处理,并通过接口 GooeyMenuInterface 来回调相应事件。其中菜单展开的位置是根据每个菜单项的角度来确定的,角度区间在 [0, 180] 具体由 n + 1 项来平分。展开收起动画通过属性动画对 CirclePoint 中的 radius 对象的变化来不断重绘,
记录一些小知识点:
如何利用贝塞尔曲线画圆
将圆分为4段绘制:
P_0 = (0,1), P_1 = (c,1), P_2 = (1,c), P_3 = (1,0)
P_0 = (1,0), P_1 = (1,-c), P_2 = (c,-1), P_3 = (0,-1)
P_0 = (0,-1), P_1 = (-c,-1), P_3 = (-1,-c), P_4 = (-1,0)
P_0 = (-1,0), P_1 = (-1,c), P_2 = (-c,1), P_3 = (0,1)
with c = 0.551915024494.
方法原文:贝塞尔曲线画圆
通过不断改变上面的 c 值,并不断的刷新界面,就会有圆形不断变化的动画。
如何通过贝塞尔曲线画心形: 贝塞尔曲线画心形
自定义属性是一个数组的处理
在自定义中,有时需要传入一个数组,比如一个图片数组,一个文字数组等,在初始化的时候可以这样处理,比如初始化一个图片List《Drawable》:在 attrs 我们将这个自定义的属性类型设置为引用类型:
<attr name="menu_drawable" format="reference"/>
在初始化中,先得到 typedArray, 之后在利用下面的方式初始化数组:
TypedValue outValue = new TypedValue();
if (typedArray.getValue(R.styleable.ExpandableMenu_menu_drawable, outValue)) {
   Resources res = getContext().getResources();
   TypedArray array = res.obtainTypedArray(outValue.resourceId);
   mDrawableArray = new ArrayList<>(array.length());
   for (int i = 0; i < array.length(); i++) {
       TypedValue value = array.peekValue(i);
       mDrawableArray.add(ContextCompat.getDrawable(mContext, value != null ? value.resourceId : 0));
   }
   array.recycle();
}
onAttachedToWindow() / onDetachedFromWindow()
onAttachedToWindow() 方法在 onDraw() 之前调用,可以用于一些初始化操作,onDetachedFromWindow() 在 view detached from a window 的时候调用,可以在这里释放一些资源。
AllAngleExpandableButton
思路: 界面上就定义一个按钮,当点击按钮的时候在此按钮上面覆盖一层 View 用来绘制新的按钮和展开的其他菜单子项,背景利用 View 的 cache 来做为模糊的背景,在 onTouchEvent() 中,根据按钮状态的变化动态改变背景色,还有涟漪的绘制。
获取视图在屏幕中的位置
正常在自定义 View 的时候,我们会在 onMeasure() 中测量 View 的大小,在 setMeasuredDimension() 之后我们便可以得到 View 的大小,当然我们也可以在 onSizeChanged() 方法中得到 View 的大小,一般也是在 onMeasure() 方法之后会回调 onSizeChanged() 方法,注意 onMeasure() 可能会回调多次,此时我们只能得到 View 的宽和高,还不能确定 View 在视图中的位置,一般的自定义 View 要么在 onDraw() 中制定绘制的位置,要么就是在 xml 中指定 View 的位置,我们可以通过监听视图树的变化,来确定 View 最终在屏幕中的位置,比如可以在自定义 View 初始化中注册视图监听,当 View 树状态改变或者 View 树里面的 view 的可见性发生变化时就会回调 onGlobalLayout(),在这里我们可以取到 View 的宽高,也可以取到 View 在屏幕中的位置:
private void initViewTreeObserver() {
    ViewTreeObserver observer = getViewTreeObserver();
    observer.addOnGlobalLayoutListener(new ViewTreeObserver.OnGlobalLayoutListener() {
        @Override
        public void onGlobalLayout() {
            // View 在屏幕中可视区域
            getGlobalVisibleRect(rawButtonRect);
            rawButtonRectF.set(rawButtonRect.left, rawButtonRect.top, rawButtonRect.right, rawButtonRect.bottom);
        }
    });
}
View 中一些方法的区别
- getGlobalVisibleRect(Rect r) / getGlobalVisibleRect(Rect r, Point globalOffset)
- getLocalVisibleRect(Rect r)
- getLocationOnScreen(int[] outLocation)
- getLocationInWindow(int[] outLocation)
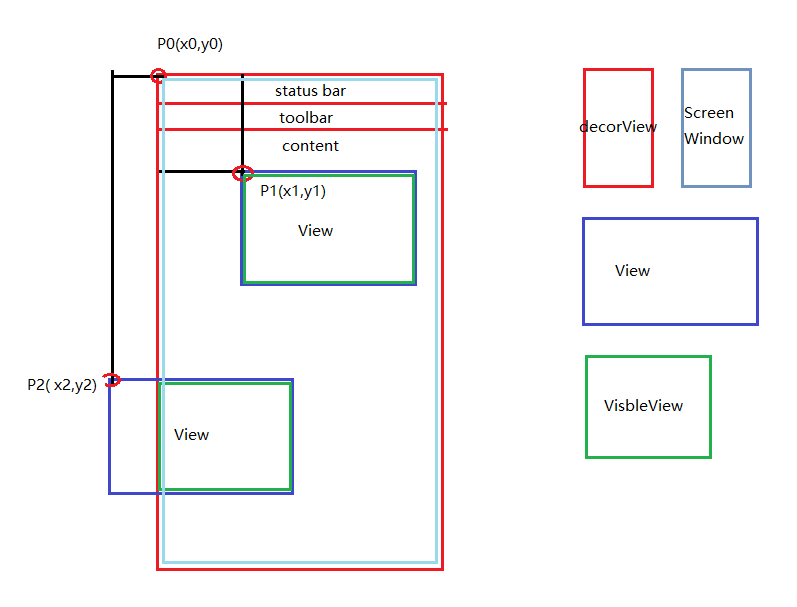
getGlobalVisibleRect() 方法实际上调用的是两个参数的方法,该方法目的是获取视图 View 在屏幕上的可视区域,如上图中两个 View 中的可视部分也就是绿色矩形部分, Rect r 是 View 的可视区域,globalOffset 是 View 对于屏幕坐标原点的偏移量。
getLocalVisibleRect() 方法取得也是 View 的可视区域,只不过返回的左边是以 View 本身为参考系的,该方法实际上也是先调用,getGlobalVisibleRect(r, offset) 方法,通过:
r.offset(-offset.x, -offset.y); // make r local
来将坐标转换为本地坐标。
getLocationOnScreen() / getLocationInWindow() 方法取 View 在 屏幕(Screen)/ 窗口(Window)中的坐标,普通的 Activity 窗口是占满这个屏幕的,包括状态栏,所以两个方法返回的值是一样的,当前的窗口是 dialog 的时候,返回值就会有差别,getLocationInWindow() 取得就是 dialog window 中的坐标,getLocationOnScreen() 返回的就是屏幕中的坐标。
除了 View 中的这些方法,Activity 中还有一个方法可以取到我们能够展示内容的区域,包括标题栏和内容区,不包括状态栏:
getWindow().getDecorView().getWindowVisibleDisplayFrame(r)
取到的值我们能够用来计算状态栏的高度(r.top)还可以在自定义键盘中动态计算键盘的高度(不弹出键盘时 H = r.bottom, 弹出键盘时 H1 = r.bottom, 两者相减便是键盘的高度)等。
自定义 Veiw 的时候,如果在 xml 中制定了位置,那么在 onDraw()时,绘制的位置的坐标是相对于父 View 的原点来计算的。
绘制shadow
在 Material design 我们可以给 View 添加一个 Elevation 值,可以让 View 有一个阴影效果,之前看到过有人用 layer-list 也能做出阴影效果,现在又 get 到了该库作者是怎么实现阴影的一个思路,实质也是绘制一个背景,但是并没有真正的 Elevation 属性(Elevation为1的 cardView 可以遮挡住 cardView 上面 Elevation 为 0 的 floatingButton),主要代码如下:
// 例子中是给一个 button 实现添加 Elevation 的效果
// 先创建一个 buttonRadius + Elevation 的 bitmap
Bitmap bitmap = Bitmap.createBitmap(bitmapSize, bitmapSize, Bitmap.Config.ARGB_8888);
bitmap.eraseColor(0x0);
int colors[] = {ColorUtils.setAlphaComponent(BUTTON_SHADOW_COLOR, BUTTON_SHADOW_ALPHA),
        ColorUtils.setAlphaComponent(BUTTON_SHADOW_COLOR, 0)};
float stops[] = {(float) (buttonRadius - buttonElevationPx) / (float) bitmapRadius, 1};
Paint paint = new Paint();
paint.setAntiAlias(true);
// 给 Paint 添加着色器 采用 径向渐变 设置渐变的颜色 位置 和 CLAMP 填充模式
paint.setShader(new RadialGradient(bitmapRadius, bitmapRadius, bitmapRadius, colors, stops, Shader.TileMode.CLAMP));
// 利用画布将 bitmap 绘制出来
Canvas canvas = new Canvas(bitmap);
canvas.drawRect(0, 0, bitmapSize, bitmapSize, paint);
// return bitmap, 此时 bitmap 就可以作为 button 的背景
这里也给了一个方法就是我们在自定义 View 中如何给我们的 View 利用代码绘制出一个比较复杂的背景 bitmap ,然后作为 View 的背景。
绘制点击涟漪
在 Material design theme 中按钮点击会有涟漪扩散的效果,这种动画也是可以通过 onDraw() 给绘制出来,主要是绘制一个圆,一触摸点为圆心不断改变圆的半径,以形成动画。
取已知颜色的浅色或深色
通过将颜色转换为 HSV,通过改变其中的的值,来取得深色或浅色. HSV维基百科
private int getLighterColor(int color) {
    float[] hsv = new float[3];
    Color.colorToHSV(color, hsv);
    hsv[2] *= 1.1f;
    return Color.HSVToColor(hsv);
}

private int getDarkerColor(int color) {
    float[] hsv = new float[3];
    Color.colorToHSV(color, hsv);
    hsv[2] *= 0.9f;
    return Color.HSVToColor(hsv);
}
背景模糊(高斯模糊)
这里通过RenderScript调用底层接口实现高斯模糊计算,这个使用 v8.renderscript 能兼容 2.2 以上的版本,但是模糊半径有限制 0 < r < 25,具体模糊如下,在子线程进行模糊将结果回调到主线程,在模糊中先缩小图片再进行模糊可以达到优化性能的效果:
public class Blur {
private static final float SCALE = 0.4F;

private float radius;

private Thread blurThread;
private Context context;
private Bitmap inBitmap;
private Callback callback;

public Blur() {
    initThread();
}

private void initThread() {
    blurThread = new Thread(new Runnable() {
        @Override
        public void run() {
            final Bitmap blurred = getBlurBitmap(context, inBitmap, radius);
            Handler handler = new Handler(Looper.getMainLooper());
            handler.post(new Runnable() {
                @Override
                public void run() {
                    if (callback != null) {
                        callback.onBlurred(blurred);
                    }
                }
            });
        }
    });
}

public void setParams(Callback callback, Context context, Bitmap inBitmap, float radius) {
    this.callback = callback;
    this.context = context;
    this.inBitmap = inBitmap;
    this.radius = radius;
}

public void execute() {
    blurThread.run();
}

@WorkerThread
private Bitmap getBlurBitmap(Context context, Bitmap inBitmap, float radius) {
    if (context == null || inBitmap == null) {
        throw new IllegalArgumentException("have not called setParams() before call execute()");
    }

    int width = Math.round(inBitmap.getWidth() * SCALE);
    int height = Math.round(inBitmap.getHeight() * SCALE);

    // 先将原图缩小再进行模糊操作 优化
    Bitmap in = Bitmap.createScaledBitmap(inBitmap, width, height, false);
    Bitmap out = Bitmap.createBitmap(in);

    RenderScript rs = RenderScript.create(context);
    ScriptIntrinsicBlur blurScript = ScriptIntrinsicBlur.create(rs, Element.U8_4(rs));

    Allocation allocationIn = Allocation.createFromBitmap(rs, in);
    Allocation allocationOut = Allocation.createFromBitmap(rs, out);

    blurScript.setRadius(radius);
    blurScript.setInput(allocationIn);
    blurScript.forEach(allocationOut);
    allocationOut.copyTo(out);

    allocationIn.destroy();
    allocationOut.destroy();
    blurScript.destroy();
    rs.destroy();

    return out;
}

public interface Callback {
    void onBlurred(Bitmap blurredBitmap);
}
}
高斯模糊参考:模糊效果
弹出布局
在这种弹出控件中,我们当然希望控件的大小只有未弹出的时候一样大,这样方便自定义的 View 加入到其父容器中,不然的画,我们自定义的 View 的大小至少应该包括弹出后控件的大小,这样很影响我们的自定义 View 融入到其他布局中,文中的实现方法给我们提供了一种新的思路,未弹出时只绘制未弹出时应该有的大小,当弹出时我们将当前屏幕截屏然后加以模糊效果以作为弹出 View 的整体背景。
也学到了一些 matrix 的东西,可以发现,我们在弹出菜单时同事进行了位移动画,和旋转动画,上述作者在实现中利用了 canvas.concat(matrix) 的方法,其中利用矩阵保存了要进行的变换,在应用到整个画布上。